Manual / Sections & moving cuts
Sections & moving cuts
A section is a slab cut through everything in the scene: drilling, models, terrain and map layers. What sits in front of and behind the slab is hidden, never removed, so you can read the rock inside it on its own and turn the section off again at any time.
Cut a section
- Turn it on.
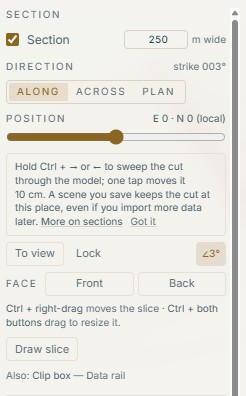
Tick Section on the Viewer card (or press Ctrl+/). A thin slab opens through the middle of the scene.
- Choose a direction.
Along runs the cut down the strike of your data and Across at right angles to it; Plan slices horizontally. ES3D takes the strike from the largest visible block model, otherwise from the drill traces, otherwise from the shape of the map layers, and shows it beside the row (strike 003°). With nothing to take a strike from, the choices are E–W, N–S and Plan.
- Set the width.
Type the slab’s thickness in the m wide box. The section stays centred where it is.
- Move it.
Drag Position. Above the slider the section’s place is written in your project’s coordinates: an easting or northing for a vertical cut, a reduced level (RL) for a plan cut, and both for a cut on another bearing. A project with no coordinate system shows local metres, marked (local).
Read it from the keyboard
| Keys | What it does |
|---|---|
| Ctrl+← / → | Move the section 10 cm (2.5 cm with Shift). Hold to sweep it through the whole scene in about six seconds, whatever its size; Shift sweeps at a quarter of the speed. |
| Ctrl+↑ / ↓ | Widen or narrow it around its centre. |
| F / K | Remove everything in front of, or behind, the section. |
| C | Centre it. |
| Ctrl+L | Lock it to the camera, so it turns to face you as you orbit. |
Sweeping is the quickest way to see where mineralisation starts and stops along strike. In Present the plain arrow keys sweep, without Ctrl. Mouse gestures, To view, Draw slice and Face are covered in Slicing & viewing tools, and a block model can aim a section at itself in one click (Section through this model).
A section is a place
A section is held as a place on the ground, not as a share of the scene. Import a larger layer and the scene grows, but your section stays on the same easting, and so does every scene you saved with one. Scenes saved before this worked are fixed in place the first time their project opens.
Sections in a story
Save a scene with a section and the Story tab shows a Section block for it. It says how the cut arrives:
- It glides in with the camera when the scene before it cuts in the same direction.
- It jumps when the scene before has no section, cuts another way, or the transition is a cut. The block says which. To make a run of sections glide, aim them the same way, for example all Along.
Tick Sweep the cut while this scene holds to move the section while the scene is on screen. Once the camera lands, the cut slides from where the scene saved it to an end place over the scene’s Duration, then stays there. The first end is the far side of the scene. To choose your own, move the live cut with Position and press Set end here, then Preview to watch it. Moving the cut yourself, or stopping the story, ends a sweep where it is. If the viewer has reduced motion turned on, the cut goes straight to its end place. The scene after a sweep glides on from where the sweep finished.
Exported movies play glides and sweeps the same way Present does (Exporting).