Manual / Slicing & viewing tools
Slicing & viewing tools
The draggable Viewer card on the canvas holds the working tools — Cut, Inspect, Annotate, Export and Display. It collapses to its header when there's nothing to cut yet.
Slicing
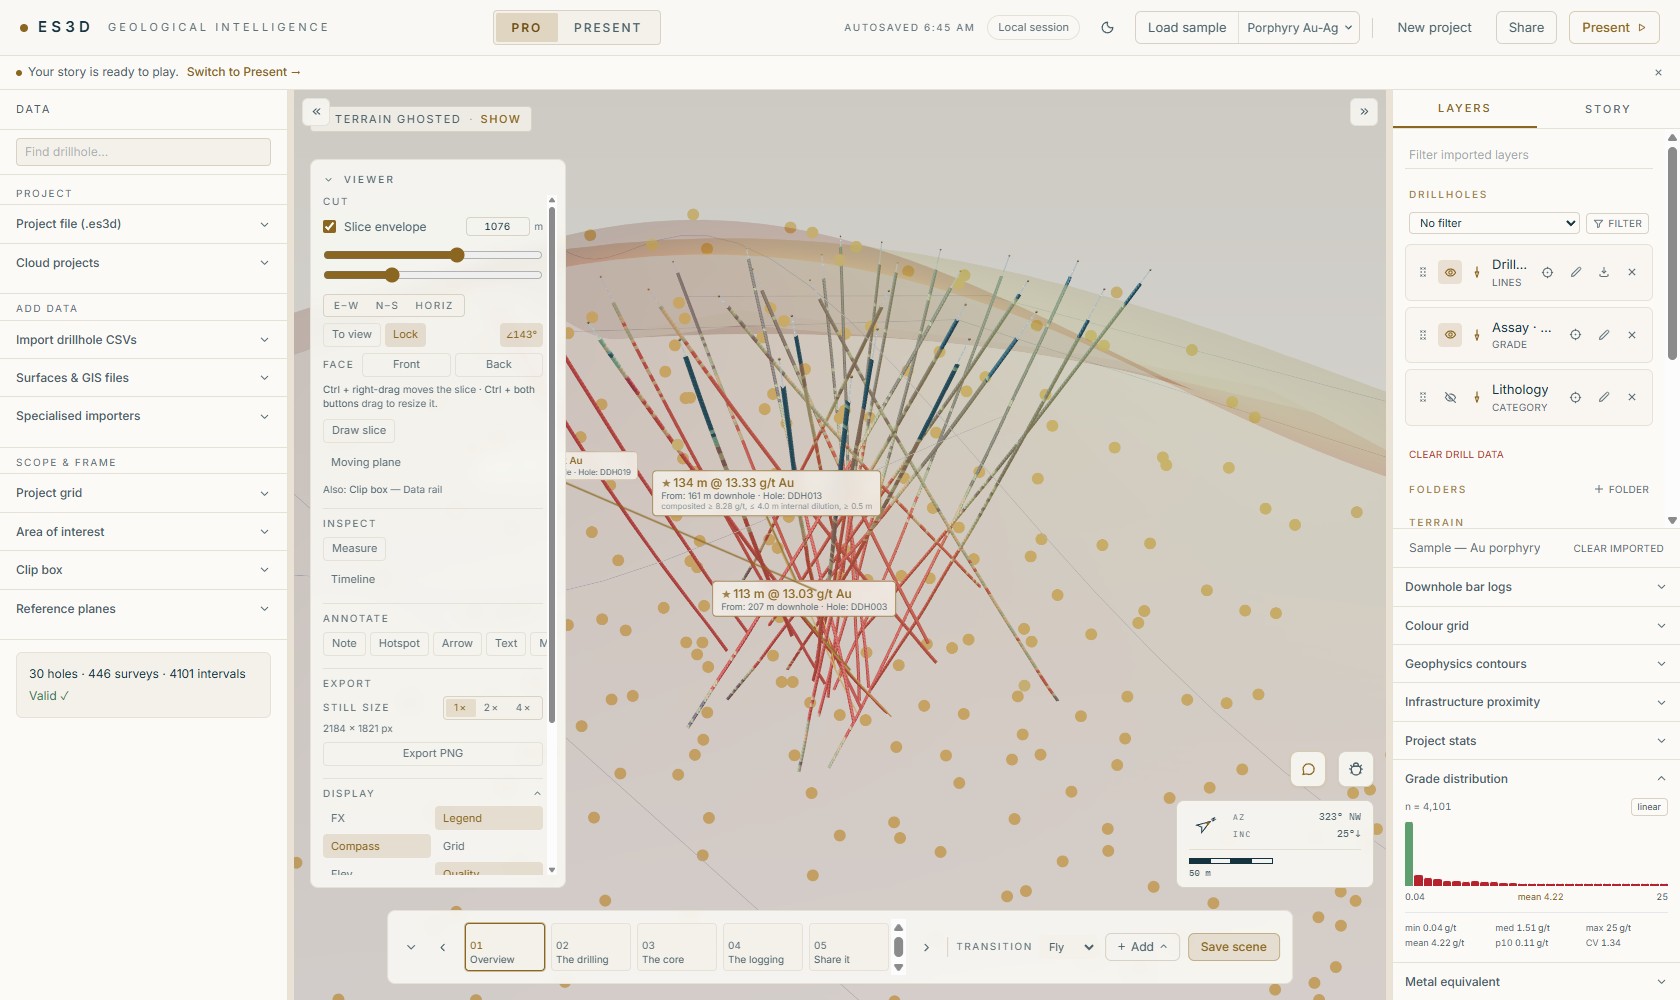
- Enable the envelope.
Tick Slice envelope and set the band width in metres. The near and far sliders move the two edges of the visible band.
- Aim it.
E–W / N–S / Horiz pick an axis; To view orients the cut to your current bearing (a ∠ chip shows a custom angle); Face: Front / Back looks square at the plane.
- Or draw it.
Draw slice: look down (D), trace a line along the mineralisation, and the cut runs along your line.
- Lock it to the camera.
Lock re-orients the slice to face you as you orbit — the classic Leapfrog Ctrl+L reading.
- Drive it with gestures.
Ctrl+right-drag moves the slice; Ctrl+both-buttons drag resizes it (push away to open the envelope, pull toward you to close it). The resize is deliberately gentle and scales with the envelope: a thin section opens or closes in fine steps, a wide one moves faster, and one long pull opens it by about two-thirds again; Ctrl+←/→ move it and Ctrl+↑/↓ widen or narrow it (hold Shift for a fine step); , / . step it; F / K remove front/back; C centres it. The arrows keep the slice’s centre where you put it, so widening grows it around your target rather than walking it off screen.
- Step it in metres, or hold to sweep.
One press of an arrow moves the cut 10 cm — a real distance, not a percentage, so the same key does the same thing on a 300 m prospect and a 4 km porphyry. Hold Shift for a 2.5 cm step when you are lining a cut up on a specific intercept.
Hold the arrow down and the cut glides continuously, sweeping the whole model in about six seconds whatever its size — the quickest way to read where mineralisation starts and stops. Shift slows the sweep to a quarter speed. In Present the plain arrow keys do this, with no Ctrl.
The moving plane is the orientation probe: enable it, set dip / dip-azimuth / pitch (or draw the strike line), and read structure orientation straight off the model.
Measure & timeline
Measure (Ctrl+4): click two points for a real-world distance with horizontal and Δelevation breakdown — and it only measures to what is actually drawn. Timeline scrubs the drilling campaign in sequence.
Annotations
Note (A) pins a text note to a point on the model; Hotspot (H) drops a numbered marker that expands to a title and callout; Arrow (Shift+A) spans two points with a distance arrow. Annotations belong to the active scene, travel in share links, and are read-only for your audience — save or select a scene first.
Text blocks
Text (Shift+T) drops a block of text on the scene — a paragraph, sized to be read, with no pin and no numbered marker. Click where it should go and start typing; the caret is already there. Click a block later to edit it again, ⠿ Move to drag it, and set its size, width, font, weight, slant, alignment, leading, tracking, rotation, halo, colour and box from the strip underneath. Esc finishes editing.
Width sets where the text wraps rather than drawing a fixed rectangle, so a short line still shrinks to fit. Font offers the three brand type voices — Sans for the interface, Serif for editorial prose, Mono for data. B and I set weight and slant, and Rotate turns the block about its own centre. Align, Leading (line height, as a multiple of the type size) and Tracking (letter spacing) are the typographic controls; Halo strokes a contrasting outline under the letterforms, which is what keeps a caption readable over grade-coloured geology where changing the text colour alone cannot. All of them carry through to PNG, movie and slide exports, so what you set is what an investor receives.
A block dims while you move the camera off the scene’s saved view, and comes back when you return to it (or click Reset view). A caption is written for one framing, so once a viewer has orbited away it is prose about a view they are no longer looking at — it fades back rather than disappearing, and stays clickable so you can still edit it.
Media — photos and video
Media (I) drops a photo or an embedded YouTube video on the
scene. Click where it should sit, then paste an https image link or a YouTube share
link and set its width. Drag it like any other block.
A photo can be uploaded or added by link, and the choice
matters. An upload is stored with the project and embedded in the saved .es3d, so it
works offline and cannot go stale — but it cannot travel in a share link, because a
share link carries the whole story inside the address and a photo’s bytes will never fit
there. A linked photo travels anywhere the scene does, for as long as its host keeps serving it.
Upload for a deck you will send as a file; link for one you will send as a URL.
A video plays in the viewer and in shared links only: a photo is drawn into PNG, movie and slide exports, while a video is marked with a short caption, because a running video cannot be composited into a still frame. Use a photo where the export matters.
Blocks belong to the scene, so each beat carries its own, and they travel in share links and
the saved .es3d with everything else. Like arrows, they fade across a scene change
rather than cutting.
Distance arrows
An arrow is for scale — the size of a district, the strike length of a trend, the step-out to the next target. Click two points and it states how far apart they are, in type big enough to carry a slide.
The clicks do not have to land on anything. A click into open sky lands on the plane the view implies — a level plane at the elevation you are orbiting — so you can span a whole property, not just the parts you have drilled. Drag either end and the number follows. Arrows stay visible when the slice band moves: a span you drew between two points you could see does not disappear because you cut the model somewhere else.
The number is the true 3D distance. Where relief makes that materially longer than the distance on the map, the label reads true after the number — an unqualified length on a line that looks horizontal in plan would otherwise read as a map distance. On flat ground the two agree and the label is just the number.
Editing an arrow
Click the number (or the arrow itself) to select it. Two gold handles appear at the ends and a small panel opens beside it. Drag either handle to move that end — it snaps to whatever it lands on and otherwise falls to the plane the view implies, exactly as placing it did, and the number follows as you drag. The handles belong to the selected arrow only, so a scene with six arrows does not become a scene with twelve dots.
For the drafting look — |<--- 1 km --->|, with a vertical line marking
each end — press Dimension at the top of the panel. It sets the end
lines in one step; the controls below still show what it set, so you can take it from there.
| Control | What it does |
|---|---|
| Colour | Shaft, heads and end lines together. Ore-gold by default — worth keeping unless the arrow has to read against gold ground. |
| Thickness | Shaft width in screen pixels, so it reads the same whether the arrow spans 40 m or 4 km. The heads grow with it unless you have sized them yourself. |
| Head size | Arrowhead length. 0 draws a plain span line with no heads at all. |
| End lines | The draughtsman's witness lines at each end, marking exactly where the measurement starts and stops. 0 is off. |
| Gap | How far the arrow stops short of the end lines. The lines never move — they mark where the measurement stops, so it is the arrow that is inset. 0 puts the arrowhead tips right on them. |
| Direction | Which way those end lines run. Plumb is vertical in the world, like a dropped plumb line, and does not move as you orbit. Face view keeps them square to the arrow on screen — use it in plan view, where a plumb line points straight at you and disappears. |
| Caption | Optional text above the number (“Strike length”). The number itself is measured and cannot be typed over. |
Under The number you can set its Size and Text colour, and open Box for the chip behind it — fill, corner radius, padding, and a border colour and width. What you set is what the PNG, the movie and every deck slide carry: the export reads the chip's real style rather than drawing a standard pill, so the slide matches the screen.
Label is what the arrow SAYS. Leave it empty and it shows the measurement, which is the default and what most arrows should do. Type into it when you want something tidier on a slide — “1 km” across a span that measures 992.5 m. The panel keeps the real distance in view underneath while you do, so you can always see the number you replaced.
Round does the common version of that for you, and it will not overstate: it offers the cleanest number within 10% of the true distance. 992.5 m rounds to “1 km”; 1,234 m becomes “1.2 km” rather than “1 km”, because that would be 19% short. Anything further from the truth than that, you have to type yourself — an arrow is a claim about the size of a property, and it sits in a document under an NI 43-101 / JORC header.
Everything here travels with the scene: share links, story beats and the saved
.es3d all carry it. Sizes are in screen pixels rather than metres, so an arrow looks
the same to your audience at their window size as it did at yours. Arrows opened in an older build
of ES3D still draw, and still show the right measurement — they just draw in the default
style, and saving from that older build drops the styling.
Display
The Display grid toggles the viewing furniture. The ones you'll touch most:
| Toggle | What it does |
|---|---|
| FX | Cinematic post-processing (bloom + AA, WebGPU only) with presets 1–4, plus Depth fade, Edges (eye-dome lighting) and Fog, each with a strength slider. |
| Legend | The on-canvas grade / lithology key — when shown, always exactly what the screen shows. (A share link minted with Minimal chrome on phones withholds it on handhelds.) |
| Compass · Grid · Elev | North/scale/azimuth box, ground reference grid, and the real-elevation (RL) scale post. |
| Plan · North-up | True-scale orthographic plan view, optionally locked north-up. |
| Strat | The stratigraphic column key (youngest first). |
| Spin | Slow auto-rotate (Space; respects the OS reduced-motion setting). |
| Backdrop · Background | Flat / Studio / Horizon staging and a background colour picker. |
| Quality | Adaptive resolution for smooth orbiting on lighter GPUs. |
Terrain auto-ghosts when subsurface content exists, so the product is never hidden under a hillside; the Terrain ghosted · Show chip restores it.
Keyboard reference
The basics are on The interface; the tool keys:
| Keys | Action |
|---|---|
| Ctrl+/ | Toggle the slice envelope |
| Shift+D | Draw slice |
| Ctrl+E | Cycle the slice axis |
| Ctrl+← / → | Move the slice along its axis (Shift = fine) |
| Ctrl+↑ / ↓ | Widen / narrow the slice about its centre (Shift = fine) |
| L / Shift+L | Look at the slice (front / back) |
| Ctrl+L / Ctrl+V | Lock slice to camera / orient it to the view |
| T | Thick-slab toggle |
| Ctrl+; · M · Ctrl+3 | Moving plane: toggle · adjust · draw its line |
| Ctrl+4 | Measure |
| A / H | Note / hotspot annotation |
| Shift+A | Distance arrow |
| Ctrl+Shift+E | Export PNG |
| Ctrl+Shift+F | Cinematic FX |
| ? | The full shortcuts & gestures legend |